Creating music is an art, but when it comes to production, efficiency and organization are key. This is especially true in the realm of electronic music production, where the vast array of samples and sounds at our disposal (whether you created them, purchased them, or pirated them compulsively) can be both a blessing and a curse. After years of sticking to the same few samples, I've finally refined a workflow that maximizes both creativity and speed. In this guide, I'll share the insights and strategies that have transformed my drum rack workflow, making it faster and more intuitive than ever before.
The Evolution of Drum Racks
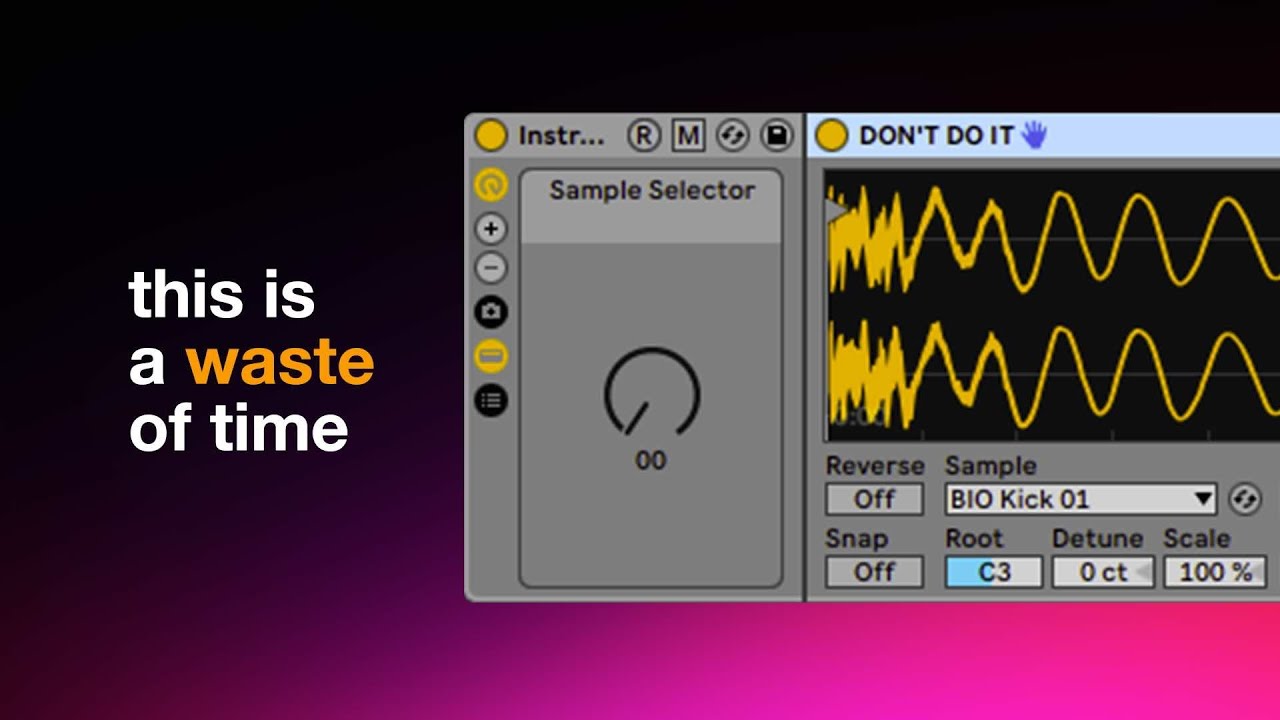
Initially, my drum racks were a chaotic collection of sounds. I had every intention of being organized, meticulously labeling each sample, from bongos to snares. However, I quickly hit the maximum limit of 128 samples that Ableton's sampler can handle in a single instance. This approach, while comprehensive, was far from efficient. The overwhelming choice led to a significant slowdown in my workflow, a common issue known as choice overload. I hit the 128 samples mark because I initially wanted to use them loaded inside the Drum Rack, leveraging the Sample Selector, but I quickly ditched that solution.
Identifying the Problems
Over time, several key issues became apparent with my initial approach:
- Overload of Choices: With 128 samples for each type of drum, making a selection became a daunting task. This not only slowed down the creative process but often led to settling for "good enough" rather than the best sound.
- Inefficient Sample Selection: Listening to each sample individually is a must, and triggering the sample separately every time was adding unnecessary steps to the process.
- Workflow Friction: The lack of visual feedback when selecting new samples and the cumbersome process of updating drum racks made the workflow clunky and inefficient.
Streamlining the Workflow
After identifying these issues, I dedicated myself to finding a solution. The result is a streamlined workflow that addresses each of the previously mentioned problems.
Reducing Sample Overload
I began by drastically reducing the number of samples in each drum rack. Instead of the overwhelming 128, I opted for a more manageable number, typically around 20. This immediately alleviated the choice overload issue, making sample selection quicker and more focused, spending around 8-10 seconds to scan them.
Organizational Strategy
The key to efficiency lay in how I organized my samples. I created genre-specific folders with subfolders for each type of drum (e.g., claps, hi-hats, kicks). This not only made finding the right sound faster but also kept my sample library tidy and accessible. This also allows me to easily and purposely blend sounds from different genres.
Workflow Optimization
To further enhance the workflow, I loaded a representative sample from each subfolder into the drum rack. This allowed for easy swapping and auditioning of samples without having to navigate through each one individually. The process of changing a sample became as simple as selecting a new one from the appropriate folder and loading it into the rack via the Hot Swap feature.
Best Practices for Drum Rack Management
Through this journey, I've learned several best practices that can help anyone looking to optimize their drum rack workflow in Ableton Live:
- Limit Sample Quantity: Keep the number of samples per drum type to a manageable level. This reduces choice overload and speeds up the selection process.
- Organize by Genre and Type: Create dedicated folders for each genre and subfolders for each drum type (clap, big clap, soft clap, or whatever nomenclature that works for you). This will save you time and frustration in the long run.
- Streamline Sample Selection: Use a representative sample for each drum type in your racks. This simplifies the process of auditioning and swapping samples.
- Prioritize Efficiency: Remember that the goal is to create music, not to get bogged down in endless sample selection. Efficiency in your workflow allows for greater creativity and productivity.
Conclusion
Transforming my drum rack workflow in Ableton Live has been a game-changer. By reducing the number of samples, organizing my library, and streamlining the selection process, I've been able to focus more on creativity and less on the technicalities of sample management. Whether you're a seasoned producer or just starting out, these strategies can help you optimize your workflow, making music production a more enjoyable and efficient process. Remember, the goal is to let your creativity flow without being hindered by the tools you use. Happy producing!